SPT Blog

Accounting for Site / Subsite regional time zone settings

Often times, you will have custom web parts or code that write date values back to lists. In many cases, time zone settings are different across an organization and using DateTime.Now is generally not recommended. Two scenarios come to mind. #1, when a site changes its time zone to be different than the hosted servers' time zone. #2,  if a web part was deployed across a Site Collection and used in 5 different sub-sites with 5 different regional time zone settings. I found the best way to retrieve a date is this here: // time zone of site SPTimeZone siteTimeZone = SPContext.Current.Web.RegionalSettings.TimeZone; // currentTime will contain the current date and time according to the sites' time zone settings DateTime currentTime =  siteTimeZone.UTCToLocalTime(DateTime.Now.ToUniversalTime()); This will give you the current time in relation to the Site Regional Settings and will account for changes to the settings.
By |2014-05-17T00:24:53+00:00May 17th, 2014|Uncategorized|0 Comments

Powershell script to change Sharepoint Information Policy for large document libraries (over 1 million docs)

Ran into an issue on a SP2010 farm that had over a million documents in a document library with a hundred thousand folders. Yes, lots of data, but not a bad practice in this case as it was tied to another system that relied on the folders. In any case, I was unable to change information Policy on document library with many thousand folders due to SharePoint’s UI which creates a tree view of folders on the page to change the Information Policy. Not the best design. So as my browser crashed waiting for 100,000 folders to load, we came up with a Powershell script to accomplish this. This script will create an Information Policy to delete all documents inside the document library that are older than 180 days. It is applied to the content type, but is scoped to the document library itself. Other libraries on the site are [...]

By |2014-05-28T05:48:56+00:00April 29th, 2014|Uncategorized|1 Comment

SharePoint List ID and View ID Calculator

Simply paste the Url from the "Modify View" page in SharePoint and it will generate the List ID and View ID for you.   List ID:       View ID:        I got tired of doing this in notepad, so I built this as an easy way to get a SharePoint List ID or View ID from a Url. For the list ID, go to List Settings, and copy the Url, and paste the url in the box. For the list ID and the View ID, go to a list view, and click "Modify View," and copy the url in the box. Paste the url in the box and press 'Submit'

By |2022-12-11T19:44:48+00:00October 14th, 2013|Sharepoint on Premise|16 Comments

Setting up Office 365 on a WordPress hosted domain name

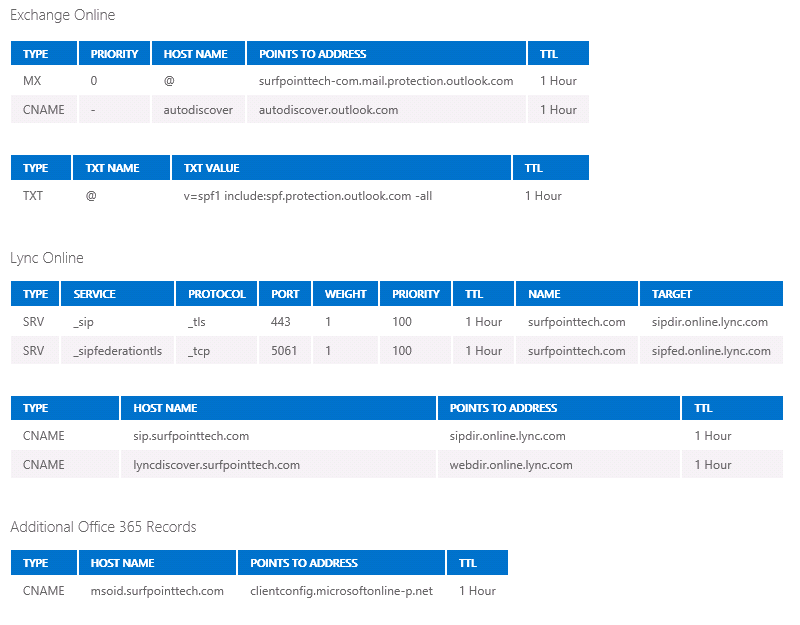
Many people use WordPress.com for their public facing website.  If WordPress manages your domain (i.e. your name server is pointing to WordPress, then you will need to set up Office 365 DNS entries on WordPress.  When setting up Office 365, you have to add appropriate DNS entries for CNAME, SRV, TXT, and MX records. The typical instructions per Microsoft look like the following: (These are for the surfpointtech.com domain, change accordingly) To add these entries in WordPress, go to your Dashboard, Store, Domains, Edit Domain.  The problem is, if you paste these straight into WordPress, it will not work. WordPress uses a shortened version for CNAME. For the SIP and LyncDiscover CNAMES, take out the ".domain.com" and it will work. If you don't do this, you will get a "Cannot connect to server" error on Lync on your iPhone. Below are the correct format DNS entries for WordPress hosted domains to work [...]

By |2014-05-28T05:14:46+00:00September 18th, 2013|Office 365 Installations|0 Comments

Fun with custom SharePoint Ribbon buttons using the built-in image formatmap32x32.png

  While creating a new ribbon button, you will have to pick the button image.   This handy image is located here: http://yousite/_layouts/en/images/formatmap32x32.png Now you will need to reference the top left corner of the image: Open it in MS Paint and hover the top left corner of the image to get the approximate values. Each image is 32x32 pixels, so you can just start multiplying by 32 to go across and same to go down to get the exact values. So, for example, go 448 px down and 384 px from the left This image for the check mark is located at Image32by32Top="-448" Image32by32Left="-384" (down at the bottom right corner)     For the formatmap16x16.png image just divide by 2.   Here is a portion of the Elements.xml that references the button image location: <CommandUIDefinition Location="Ribbon.ListItem.Workflow.Controls._children"> <Button Id="SurfPoint.SharePoint.Ribbon.NewControlInExistingGroup.Notify" LabelText="Approve Records to Delete" ToolTipTitle="Approve Records to Delete" ToolTipDescription="Check all records [...]

By |2022-12-11T19:44:49+00:00September 14th, 2013|Sharepoint on Premise|1 Comment

Understanding Office 365 terms

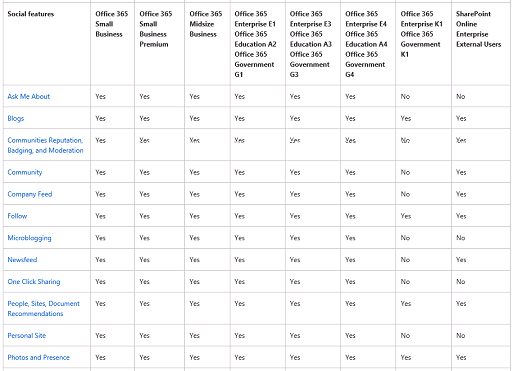
Here's a good reference of what the actual deliverables are for Office 365. The terms can get confusing, especially when trying to understand the Office 365 Pro Plus and the desktop suite. •Office 365 Platform includes information about the Office 365 hosted solution platform that is common across the other services. The Office 365 Platform service description is where you'll find details about Office 365 user management, support, service updates, privacy and security policies, and other operational details that apply across the individual services and are part of the core Office 365 service. •Exchange Online is a hosted messaging service offered in some Office 365 plans that web-based email, calendar, contacts, and tasks from PCs, the web, and mobile devices. In the Exchange Online service description, you can easily see which Exchange features are available across Office 365 plans. In addition, you can compare Exchange Online feature availability to an [...]

By |2022-12-11T19:44:49+00:00September 12th, 2013|Office 365 Installations, SharePoint in the Cloud|0 Comments

Migrate a SharePoint workflow from Visual Studio 2008 to Visual Studio 2010

This is a useful article when converting a custom workflow project from Visual Studio 2008 to Visual Studio 2010: http://blogs.msdn.com/b/bethmassi/archive/2010/01/15/migrating-a-2007-workflow-to-visual-studio-sharepoint-2010.aspx In a nutshell, Go ahead with the conversion wizard Add a new Project (2010 Sequential Workflow Project) to the solution Rename the Workflow1  folder to the new name - Very Important, you have to keep this folder in order for the workflow to be in the feature, so just rename it. Copy the old workflow.cs file to the new folder in the new project. This will bring over the designer file and rules file (if applicable). Delete the worflow1.cs and update the class name to the new class name Copy over all other files that are not related to packaging such as Utility classes. Copy default namespaces to new project. Check your default namespaces, namespaces in Elements.xml, assembly versions Update namespace in new project on the .cs file, and .designer.cs file. [...]

By |2022-12-11T19:44:49+00:00August 29th, 2013|Sharepoint on Premise|0 Comments

Debugging Custom Event Receivers – Strange Error on custom Event Receiver SharePoint 2010. .c__DisplayClass2.b__0()Object reference not set to an instance of an object.

Debugging Custom Event Receivers. Here's a weird error that took some time to figure out. Generic "Object reference not set to an instance of an object." Error on a custom SharePoint 2010 event receiver. If I went through the UI to change a field on a list, the event receiver fires fine. But, if a workflow changed the field it threw the error below. I finally found if I attached the OWSTimer process to Visual Studio, it would debug, but still not show the exact problem. The solution is to find the Log On account for OWSTimer in the Services console (services.msc) and then to grant that account permissions on the list that the event receiver is running on. Edit -checking the permissions of the OWSTimer account is just one possible solution.  What I found out was that the list was hanging on to old event receivers as well.  I [...]

By |2022-12-11T19:44:49+00:00May 23rd, 2013|Sharepoint on Premise|0 Comments

Missing All People Links in SharePoint 2010

We used this to delete users from the site collection in SharePoint 2007. It was gone in 2010, but really just "hidden." Simply paste the following URL into your browser and change the site name and you wll get the All People page back.  Useful for deleting users from the site collection. http://My2010Site/_layouts/people.aspx?MembershipGroupId=0&FilterField1=ContentType&FilterValue1=Person

By |2013-05-07T15:31:37+00:00May 7th, 2013|Sharepoint on Premise|0 Comments

Hide Left Navigation in SharePoint 2010

Here's a quick reusable way to hide the left navigation.  Create a text file called "HideLeftNav.txt" in a document library.  Add the following css code: <style type="text/css"> /*--Hide Quick Launch --*/ #s4-leftpanel{ display:none } .s4-ca{ margin-left:0px } </style>    Edit the page you want to hide the nav on, add a content editor webpart. Then, simply reference the url to the HideLeftNav.txt file and you are done.  

By |2013-04-08T21:29:04+00:00April 8th, 2013|Sharepoint on Premise|0 Comments
Go to Top